

Chapter 2 - Learning the Report Designer
See how to set the designer's properties and how to setup the report's basic structure. Secondly, you learn how to add and manipulate report objects within the designer. The tutorials give you practice creating and modifying the many report objects.
 Become a Crystal Reports expert with the authoritative resource available.
The tuturials and tips in this book will take your skills to the next level.
Become a Crystal Reports expert with the authoritative resource available.
The tuturials and tips in this book will take your skills to the next level.Buy at

Using Guidelines for Moving Objects
The last section discussed how to add objects so that they lined up with existing objects. But it didn't cover how to move multiple objects so that they stay lined up. That's where Guidelines become useful.Guidelines create an anchor for attaching objects. The benefit is that anytime you move the guideline, all the objects attached to it also move. If you have a multi-column report with many columns and you have to insert a new column, it can be difficult to move all objects over to make room for the new column. But if you anchor all the objects in a column to a guideline, then you can move the guideline and all the objects move with it. You can move entire rows and columns of fields, trouble-free, without losing alignment.
Guidelines are inserted into a report by clicking on either of the rulers. A small triangle appears, to represent where the guideline is. You can see in Figure 2-23 that there is an example of a guideline on each ruler. If you added guidelines to your report and they aren't visible, select the menu option File | Options | Layout Tab to check that the Guidelines option is enabled.
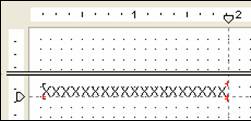
Figure 2-23. Guidelines on the ruler.
Once a guideline has been added, you can attach objects to it. Drag an object so that one of the edges lines up with the guideline. This automatically attaches the object. Objects can also be attached at the center points. A small red marker appears in the corners of the object along the edge that is attached. This makes it easy to see which objects are attached to which guidelines. Do this for all the objects in a row or column that need to stay aligned while being moved around.Be careful when moving guidelines to make sure that your mouse stays within the ruler's region. Personally, I have a strange habit of accidentally moving my mouse out of the ruler region and this makes the guideline disappear. Hence, if you deliberately want to remove a guideline then click on it and drag it off the ruler. If you did this by mistake, press Ctrl-Z to undo the action and the guideline appears back on the ruler.
One thing to be aware of is that even though you can move a guideline and it takes the objects with it, it doesn't work the other way around. You can't move an object that is attached to a guideline and expect the guideline to move with the object. Instead, the object becomes unattached from the guideline and moves around independently.
1 Remember when the Internet first became popular and everyone was learning HTML for the first time? You frequently saw web pages that displayed every color imaginable, used too many types of fonts, and displayed awful graphics. This proves that having a lot of options doesn't mean you have to use them all. Fortunately, website design has improved dramatically since the early days.
2 Don't worry, after this chapter we'll go back to being "professional" and getting some serious work done. :)
3 CSS files are used for formatting HTML web pages. The specifics of creating a CSS file is not within the scope of this book. You can find reference books at your local bookstore in the Internet section.
4 This only applies if the Snap To Gridlines option is disabled because otherwise the mouse can move easily between gridlines.
To read all my books online, click here for the Crystal Reports ebooks.