

Chapter 2 - Learning the Report Designer
See how to set the designer's properties and how to setup the report's basic structure. Secondly, you learn how to add and manipulate report objects within the designer. The tutorials give you practice creating and modifying the many report objects.
 Become a Crystal Reports expert with the authoritative resource available.
The tuturials and tips in this book will take your skills to the next level.
Become a Crystal Reports expert with the authoritative resource available.
The tuturials and tips in this book will take your skills to the next level.Buy at

Adding Report Objects
The majority of your time spent designing reports is spent working with the report objects. Crystal Reports gives you many types of objects for designing reports. Learning how each works is critical to being a proficient report writer. This section covers most of the available report objects (the more complex ones have their own chapter). There are two classifications of objects that can be added to a report: Report Objects and Field Objects. Report Objects are added by clicking on the Insert menu Item or using the Insert Toolbar. Field Objects are shown in the Field Explorer Window and they can be dragged and dropped onto the report. For this chapter, we'll keep it simple and focus on Report Objects. The different Field Objects are covered in separate chapters because they are much more complex than the typical Report Objects. For example, Database Fields are covered in Chapter 11, Database Connectivity, and Formula Fields are discussed in Chapter 5.Report objects are the building blocks of a report. They let you display data from a database, draw graphics and show charts for more complex printing. By understanding the purpose of each report object and how to best use it, you can create reports that display complex information in an easy to read format. In this chapter, we focus on the basic report objects and save the more complex objects for later chapters.
There are two ways to insert objects onto a report. The first is using the Insert toolbar shown in Figure 2-8. The toolbar has an icon for each type of object that can be dropped onto the report. Click on the object to insert and, depending upon the type of object it is, the mouse changes so that you can place it on the report.

Figure 2-8. The Insert toolbar
The second method of adding an object to a report is using the Insert menu option. Click on the Insert menu item at the top of the program and it presents a list of all the objects that can be added. It works the same as the toolbar: click on the object to insert and move the mouse to where the object should be placed.
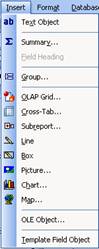
Figure 2-9. The Insert menu option.
A third method is to right-click on a report and the pop-up menu has a few insert options. However, this menu only lets you insert text objects, a cross-tab or a chart. Its uses are limited.The objects that can't be added to a report via the toolbar or menu are the objects in the Field Explorer window. These include the database fields, formula fields, parameter fields, etc. Inserting these objects onto your report requires dragging and dropping them from the Field Explorer window onto the report.
There are a lot of different objects that can be used on a report and there are many ways to use them. Most people learn best by example, so let's create a report that uses all the objects and shows the different ways they can be used. What we're going to do is create a report "sandbox." I call it a sandbox because we're just going to play around with the different objects and see what happens. It's like being a kid, where you just want to throw all your toys in it and get messy. We're not going to worry about making things look pretty right now. We just want to see how everything works.2
The first thing to do is create the "sandbox" that we'll be working in. Create a blank report that uses the Employee table. For right now, we won't even add any fields to the report. We just want them to be available when we need them.
- Go to the Start Page and click on the Blank Report option under the New Reports heading. This opens the Database Expert dialog box.
- In the Database Expert dialog box, open the Create New Connection node and select the Access/Excel (DAO) option. This opens the Access/Excel (DAO) dialog box.
- Click on the button next to the Database Name textbox and navigate to the Xtreme.mdb database. The default installation folder is
- Click the Finish button to save the database connection.
- Open the Tables node and double-click the Employee table. This adds the Employee table to the Selected Tables list on the right.
- Click the Ok button to accept the changes.
- Click the menu options File | Save As and enter the filename Sandbox.rpt. Click the Save button.
C:\Program Files\Business Objects\Crystal Reports 11\Samples\en\Databases\Xtreme.mdb.
To read all my books online, click here for the Crystal Reports ebooks.