

Chapter 1 - Introducing Crystal Reports
Learn what's new in Crystal Reports XI and the new Crystal Reports R2 release. The tutorial teaches you how to create your first report and understand the Report Expert dialog boxes. The Two-Pass Report Processing Model is explained in full detail so you understand the internal workings of Crystal Reports.
 Become a Crystal Reports expert with the authoritative resource available.
The tuturials and tips in this book will take your skills to the next level.
Become a Crystal Reports expert with the authoritative resource available.
The tuturials and tips in this book will take your skills to the next level.Buy at

Getting to Know the Designer
The report designer is the workbench where you create reporting magic. With it, you design new reports, modify existing reports, write formulas, preview reports and print them out. It gives you all the tools necessary for designing hundreds of reports. Figure 1-4 shows the designer and its various windows.
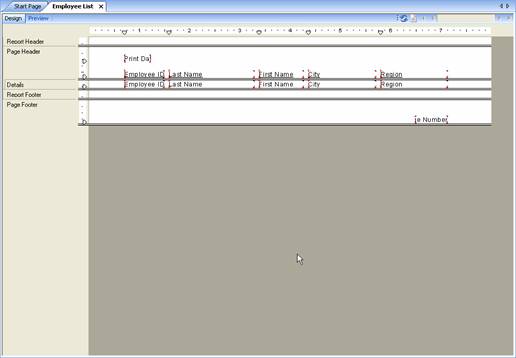
Figure 1-4. The report designer.
There are 7 parts of the designer that are important: the toolbars, dockable windows, the Workbench, the Report Explorer, the Field Explorer, the report designer, and the preview window. Each part is explored next.
Dockable Windows
The next few sections of this chapter discuss the different windows located within the designer: the Workbench, the Report Explorer, and the Field Explorer. When you first install Crystal Reports, each window is located in a particular place within the designer. If you want to personalize your workspace, then you can move them to another location within the designer. You can also close any window so that it isn't visible anymore. Here are a few tips for working with the windows.If you want to move a window to a new location, click on the top bar along the window and hold down the left mouse button. While holding down the mouse button move the mouse to where you want the window to move You will see a gray box “jump” around the screen showing you where the window will be. Once you are happy with the location, let go of the mouse and the window will be “dropped” on that location.
If you want to remove the window from the designer, click on the “X” icon in the top right corner. This closes the window. If you later decide that you want the window back (or you clicked the X by mistake), then go to the menu and select View. Within the submenu is a list of all the windows. Click on the one you want and it will become visible again.
I find that people are generally happy with the default window locations and don't want to change them. However, what happens sometimes is that they accidentally click on the window while moving the mouse around and “magically” reposition the window to some random place. If this happens to you, then you just entered “Window Hell”. I say that because it seems almost impossible to get those windows to go back to where they were. No matter how many times you drag them back to where they should be, they end up someplace else. I wish I had some easy tips to pass on to make this easier, but I don't. I struggle with it more than I care to admit. For example, when I try to move the Workbench back to the top right corner, it somehow ends up either spanning along the top of the screen or being beside the bottom right window and taking up too much space. I think its more luck than skill.
In the ideal world, the Undo menu option would work for windows as well. You could click Undo and the window would go back to where it used to be. Unfortunately, that isn't the case and you have to move the window back manually.
One feature I really like about windows is that they can be hidden but still be visible on the screen. If you look at the top of the window you'll see a thumbtack icon on the right side. This is the “Auto-Hide” icon – it makes the window visible only when you need it. Clicking on it causes the Auto-Hide feature to be toggled on or off. When Auto-Hide is on, the main portion of the toolbar is invisible and only the title bar is shown along the right side of the screen. To make the window visible, simply let the mouse hover above the title bar and it will appear again. When you take the mouse away from the window, it goes back to hiding.
To read all my books online, click here for the Crystal Reports ebooks.