This is an excerpt from the book Crystal Reports .Net Programming.
Click to read
Previewing Crystal Reports with a Windows Form
After creating the Employee List report in the previous section, you can preview it using either a Windows Form or and ASP.NET application. This section shows you how to preview it from a Windows Form. ASP.NET is covered in the next section.
Previewing the report requires modifying the form. When you created the new project, Form1 should have been automatically added to the project for you. Open Form1 in design mode and add a CrystalReportViewer control to it. This is normally listed as the last component in the Windows Forms section of the Toolbox. Resize the viewer so that it fills up the entire form. Do this by finding its Dock property and clicking on the drop-down box. Click on the middle square so that the property is set to Fill.
The viewer control has many ways to preview reports. This example uses the ReportDocument component because it is the easiest of the choices. Add the ReportDocument component to the form by double-clicking on it from the Componets section of the Toolbox. A Choose a ReportDocument dialog box automatically appears, allowing you to select which report to display. The dropdown control lists all the reports that are part of your project. For this example, it only shows the Employee List report.
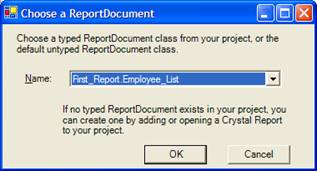
Figure 1-6. The ReportDocument dialog box.
Select the Employee List report and click the OK button. This adds the ReportDocument component to your form.
You have to tell the viewer that the report it is going to preview is in the ReportDocument component. Look at the Properties Window and find the ReportSource property. It has a dropdown control which lists the ReportDocument components on the form. In this example, the Employee List will be the only one listed. Click on the Employee_List component to select it.
Run the application. When the form loads it automatically instantiates the Employee List report object and display it using the viewer. Print it by clicking on the printer button in the menu bar. The preview of the Employee List report is shown in Figure 1-7.
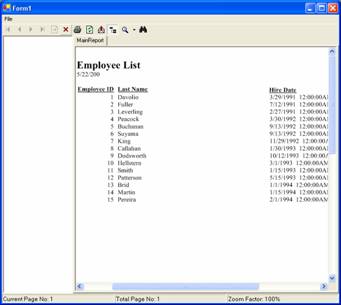
Figure 1-7. Employee List report output in preview mode.
You can see that this quick report isn't perfect. The Hire Date column shows times as always being 12:00:00 AM and the Group Tree is visible even though there aren't any groups in the report. As is usually the case, the report expert gives you a good basis for writing a report, but you still need to make some changes to clean it up.
Previewing a report with ASP.NET requires adding a CrystalReportViewer control to the web page and setting its data bindings. Open the default web page in design mode and add a viewer control to it. The viewer is located near the end of the Toolbox under the Web Forms tab. Once you add it to the form you will see a medium sized rectangle on the web page.
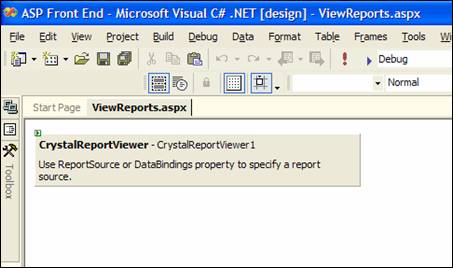
Figure 1-7. The ASP.NET report viewer control.
Notice that the web viewer control looks totally different than the Windows viewer control. The web viewer is simply a placeholder for where the report will be displayed.
Add a ReportDocument component to the web page by double-clicking on the ReportDocument component. The ReportDocument component is listed in the Components section of the Toolbox. As mention in the previous section, when you add a ReportDocument component to your form, it automatically displays the Choose a ReportDocument dialog box. This lets you select which report will be displayed. The dropdown control lists all the reports that are part of your project. For this example, it will only show the Employee List report.
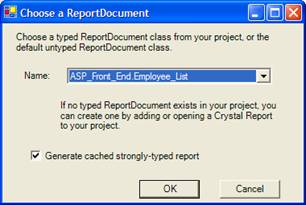
Figure 1-8. The ReportDocument dialog box.
Select the Employee List report and click the OK button. This adds the ReportDocument component to your form.
You have to associate the ReportDocument component with the viewer control so that the viewer knows which report to display. Look at the viewer's properties and at the very top is the DataBindings property. Click on it and then click on the ellipses button to open the DataBindings dialog box.
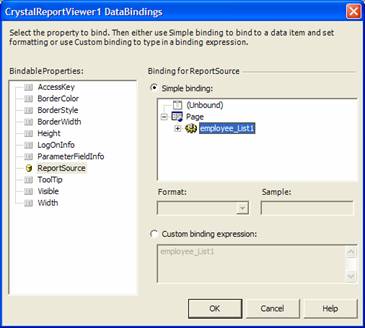
Figure 1-x. The DataBindings dialog box.
Click on the ReportSource property listed on the left. Expand the Page item in the Simple Binding window. It shows you the reports that were added to the page using the ReportDocument components. In this example, only the Employee List report is shown.
Click on the Employee List report item and click the OK button. A preview of the report is immediately displayed. Unlike Windows development, the viewer control shows you what the report looks like while you are in design mode. This a great feature for web developers!
At this point, you've performed all the same steps that were shown during the previous example for previewing with a Windows application. However, if you ran your ASP.NET application now, the report wouldn't be shown. To make the report display on the web page you have to call its DataBind() method. Do this in the Page_Load() event.
Private Sub Page_Load(ByVal sender As System.Object, ByVal e As System.EventArgs) Handles MyBase.Load
'Put user code to initialize the page here
CrystalReportViewer1.DataBind()
End Sub
After typing in this code, run the web application and you'll see the Employee List report automatically previewed when the page opens.
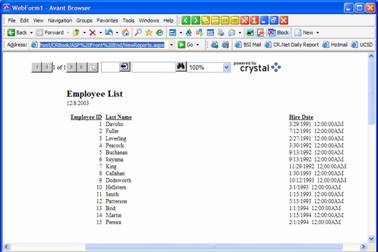
Figure 1-9. The Employee List report shown in an ASP.NET application.
 Get the best selling Crystal Reports .NET book on the market!
Learn to build .NET 2003 reporting solutions with this expert guide.
Get the best selling Crystal Reports .NET book on the market!
Learn to build .NET 2003 reporting solutions with this expert guide.