6
Programming with Built-In Functions
The Formula Workshop in Crystal Reports gives you the ability to write very powerful formulas. In addition to writing your own formulas, Crystal Reports has dozens of built-in functions that decrease the amount of work you have to do. After all, why re-invent the wheel when you don’t have too? This chapter lists and explains the different functions that come with Basic syntax. The functions are grouped by category so you can quickly find the ones you want. The categories are: String Functions, Converting Data Types, Formating Values for Output, Math Functions, Generating Random Numbers, and Date and Time Functions. If you prefer to have an alphabetical list, then reference the Index at the back of the book to see the page number of the one you are looking for.
Note
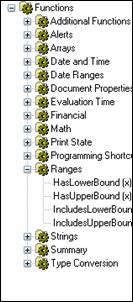
The Formula Workshop makes it easy to use the built-in functions. It gives you a Formula Functions window which lists every available function in Crystal Reports. Each node in the tree is a function category. Clicking on the plus sign next to each node expands it and shows all the functions in that category. As a refresher, the Formula Functions window is shown again here.
Not only is the function listed for you, but if it needs you to pass any additional information to it, this is listed as well. For example, if you want to select a certain number of characters from the left-most portion of a string, you would use the Left() function. In the Formula Functions window it is shown as Left(str, Length). This tells you that the first argument is the string you want to parse and the second argument is how many character you want to copy.
While most of the functions give you helpful argument information, some are not as helpful as others. For example the CStr() function converts any data type to a string and it can take up to four arguments. But when you look at this function in the Formula Functions window, it only says CStr(x, y, z, w, q). This is pretty cryptic and to figure out what each argument means you’ll have to either consult the help file or look for the reference in this chapter. When you see the function you want to use, double-click on it and it gets added to the Definition area at the bottom.
String Functions
The ability to modify and concatenate strings is a powerful feature of many programming languages, and Basic syntax doesn’t disappoint. This section breaks out the different categories of string functions and summarizes how they work. The categories are: Analyzing a String, Parsing Strings, and Manipulating Strings.
Throughout this section, many of the functions listed use one or both of the arguments called compare and start. Rather than repetitively list their descriptions throughout the chapter, they are explained here for your reference.
The compare argument determines when string comparisons are supposed to be case sensitive. If compare is 0, the search is case-sensitive. If it is 1, the search is not case-sensitive. Case sensitivity means that even if two strings consist of the exact same letters, they will still be treated as different strings if one is upper-case and the other is lower-case. For example, “Joe” would not be the same as “joe”. The compare argument is optional. If it is left out, the comparison defaults to 0 (case sensitive).
The start argument tells the function to process characters starting at a specified position.[2] Any characters that are prior to that position are ignored. This argument is optional. If it is left out, then the function is performed for the entire string.
Analyzing a String
Strings are used to store a variety of data displayed in a report. They can come from a variety of sources such as database tables, user input or even XML. Most of the time you will want to output the string directly to the report. But there are times when the information you want is stored as part of a larger string and you need to extract that data out. To do this, it is necessary to analyze and parse a string's contents. Basic syntax gives you many functions for doing this. Table 6-1 shows the functions for analyzing a string's contents. Table 6-3 shows the functions for extracting sub-strings from a string.
Table 6-1. String Analysis Functions
|
Function Name |
Description |
|
Asc(str) |
Returns the ASCII value of a character. |
|
Chr(val) |
Returns the character equivalent of an ASCII value. |
|
Len(str) |
Gets the number of characters in the string. |
|
IsNumeric(str) |
Tells if the string can be properly converted to a number. |
|
InStr(start, str1, str2, compare) |
Determines if str2 is a sub-string of str1. The start and compare arguments are both optional. |
|
InStrRev(start, str1, str2, compare) |
Same as InStr() except that it starts at the end of the string and searches towards the beginning. |
|
StrCmp(str1, str2, compare) |
Compares two strings to each other. The compare argument is optional. |
|
Val(str) |
Returns the numeric equivalent of the string. |
The StrCmp() function returns a value based upon how the two strings compare to each other. Table 6-2 summarizes what these results mean. Just like the Instr() functions, you can pass a compare argument to set case sensitivity.
Table 6-2. StrCmp(str1, str2) Return Values
|
Return Value |
Description |
|
-1 |
str1 < str2 |
|
0 |
str1 = str2 |
|
1 |
str1 > str2 |
Table 6-3. String Parsing Functions
|
Function Name |
Description |
|
Trim(str) |
Trim the spaces from both sides of a string. |
|
LTrim(str) |
Trim the spaces from the left side of a string. |
|
RTrim(str) |
Trim the spaces from the right side of a string. |
|
Mid(str, start, length) |
Return a given number of characters starting at a specified position. The start and length arguments are optional. |
|
Left(str, length) |
Return a given number of characters starting with the leftmost character. |
|
Right(str, length) |
Return a given number of characters starting with the rightmost character. |
The Trim() functions deletes all extraneous spaces from either side of the string, depending on which function you call. Trimming space from a string is useful for fields that involve data entry. This is because users will accidentally hit the space bar either before or after entering a value. Since a space is effectively invisible to the user, they will not realize that they did this. When you use this field in comparisons with other text, Crystal Reports will say that the two fields are different because they have different lengths (even though they look identical). You must use the Trim() function to get rid of any extraneous space before and after the field.
Tip
Sometimes when my reports are not coming out right and I’m doing text comparisons, I like to test if there are extraneous spaces by concatenating the letter “x” before and after the field. For example, I would use the following fomula:
Formula = “x” & {Customer.CusomterName} & “x”
Then I would scan the report to see if there are any spaces between each “x” and the field. This lets me quickly see if spaces might be causing problems.
The Mid(), Left(), and Right() functions return a partial string where the number of characters returned is based on the length argument. If you don’t pass a length argument to the Mid() function then it returns all characters starting with the first one you specified.
Manipulating Strings
It is common for a string to be modified before it is displayed on a report. This can consist of reformatting the string or even joining the different elements of an array into a single string. Basic syntax has many functions for manipulating string data. Table 6-4 shows the functions for manipulating strings. Descriptions of each function are listed next to its name. The functions Filter(), Split(), and Picture() are more complex and are defined in more detail after the table.
Table 6-4. String Manipulation Functions
|
Function Name |
Description |
|
Filter(str, find, include, compare) |
Search an array of strings for a sub-string and return an array matching the criteria. |
|
Replace(str, find, replace, start, count, compare) |
Find a string and replace it with another string. The arguments start, count and compare are all optional. |
|
StrReverse(str) |
Reverse the order of all characters in the string. |
|
ReplicateString(str, copies) |
Returns multiple copies of a string. |
|
Space(val) |
Returns the specified number of spaces as a single string. |
|
Join(list, delimiter) |
Join an array of strings into one string and separate them with the specified delimiter. |
|
Split(str, delimiter, count, compare) |
|
|
Picture(str, template) |
Formats the characters in a string onto a template. |
The Filter() function searches an array of strings for a matching sub-string. It returns an array of all the strings that have that sub-string in them. The first argument is the string array and the second argument is the sub-string to search for. Essentially, this function calls the InStr() function for every string in the array. If the InStr() finds a match, the string is added to the result array.
The Filter() function has an optional include argument that tells the function to return an array of strings that don’t match the sub-string. Essentially, this would be the same as saying that it returns all strings where the InStr() function returns a zero. Pass the include argument the value False to get an array of the strings that don’t have the sub-string in them. If you don’t pass a value for this argument, then the default value of True is used. Listing 6-1 demonstrates using the Filter() function with different arguments.
Listing 6-1. Using the Filter() function
‘Demonstrate the Filter() function
Dim StringArray() As String
Dim ResultArray() As String
StringArray = Array(“abcd”, “bcde”, “cdef”)
‘This will return an array with two elements: “abcd”, “bcde”
ResultArray = Filter(StringArray, “bc”)
‘This will return an array will return an array with one element: “cdef”
‘This is because it is the only element that doesn’t have the sub-string
ResultArray = Filter(StringArray, “bc”, False)
The Replace() function searches for a sub-string within another string, and if it finds it then it replaces it with the new string. It uses an additional optional argument called count. The count argument lets you limit how many string replacements are done. If you pass a number for this argument then the number of replacements done cannot exceed that value. If you don’t pass a value for this argument then all the sub-strings are replaced.
'Change the addresses so that they use abbreviations
Dim Streets As String
Streets = "
Streets = Replace(Streets, "Street", "St.")
Streets = Replace(Streets, "Avenue", "Ave.")
‘Streets is now “
Formula = Streets
The
The next example demonstrates combining the functionality
of the
'Demonstrate the
Dim Names As String
Dim NamesArray() as String
Names = "Mr. Jones, Sir Alfred, Ms. Bee, Mr. Smith"
NamesArray =
'Get the names that only use Mr.
NamesArray = Filter(NamesArray,"Mr.")
'RJoin the array back into a comma-delimited string
Names = Join(NamesArray, ",")
'Names is now "Mr. Jones, Mr. Smith"
Formula = Names
The Picture() function maps a string onto a template. The first argument is the source string and the second argument is the template.
The template consists of a series of “x”s with other characters around it. Each character in the source string gets mapped onto each the “x”s in the template. The source string can use any character and it will get mapped. If the source string has more characters than what can fit in the template, then all remaining characters are added to the end. If the template has any non-“x” characters, then they stay as they are.
‘Demonstrate mapping a string with non-alphanumeric characters
Formula = Picture(“ab&[{1234”, “xxx..xx..x..”)
‘The result is “ab&..[{..1..234”
This example illustrates that all characters in the source string were mapped onto the “x”s. It also shows that since the source string has nine characters and the template has six “x”s, then the extra three characters are added to the end.
Converting Data Types
Basic syntax is a type safe language that requires all constants and variables in the same formula to be of the same data type. It also requires you to pass constants and variables as arguments using the exact data type that the formula expects. Even though the data types in Basic syntax are fairly simple, you still have to make sure that they are compatible. Fortunately, this shouldn’t cause problems because there are functions to convert between the different data types. Table 6-5 lists these conversion functions.
Table 6-5. Conversion Functions
|
Conversion Function |
Description |
|
CBool(number), CBool(currency) |
Convert to Boolean. |
|
CCur(number), CCur(string) |
Convert to Currency. |
|
CDbl(currency), CDbl(string), CDbl(boolean) |
Convert to Number. Equivalent to ToNumber(). See the section “Formatting Values for Output”. |
|
CStr() |
Convert to String. Equivalent to ToText(). |
|
CDate(string), CDate(year, month, day), CDate(DateTime) |
Convert to Date. |
|
CTime(string), CTime(hour, min, sec), CDate(DateTime) |
Convert to Time. |
|
CDateTime(string), CDateTime(date), CDateTime(date, time), CDateTime(year, month, day) |
Convert to DateTime. |
|
CDateTime(year, month, day, hour, min, sec) |
Convert to DateTime. |
|
ToNumber(string), ToNumber(boolean) |
Convert to a Number. |
|
ToText() |
Convert to String. Same as CStr(). |
|
IsDate(string), IsTIme(), IsDateTime() |
Test a string for being a valid date/time. |
|
IsNumber(string) |
Test a string for being a valid number. |
|
ToWords(number), ToWords(number, decimals) |
Convert a number to its word equivalent. |
Most of the above functions are very simple. Pass the function a field/variable of one data type and it returns the equivalent in the other data type. The CBool() function takes a number or currency value and converts it to Boolean True or False. Any non-zero value is converted to True and zero is converted to False. When it is displayed on a report, it prints the words “True” or “False”.
The CCur() function takes a number or string and converts it to the Currency data type. When converting a string, it can have formatting characters in it (“$”, “,”, etc.) and it will still be converted properly.
The CDbl() and ToNumber() functions are equivalent. Pass each a value and it gets converted to a number.
The CDate(), CTime() and CDateTime() are all similar. Pass them a string and it gets converted to the proper data type. The string parser for this function is very sophisticated. It lets you pass strings as diverse as “Jan 19, 1991”, “5/26/1998” and “2002, Feb 04”. You can also pass numbers as individual arguments for representing the different parts of a date and time. See Table 6-5 for the various argument options.
When converting a string to a date or number, you run the risk of raising an error if the string isn’t in the expected format. You can avoid this by testing the strings validity before converting it. The IsDate() and IsNumber() functions do this for you. They return True if the string can be properly converted. If not, they return False. For example, here is a function that converts a string to a date, but only if it is a valid date.
If IsDate({Invoice.ExpirationDate}) Then
Formula = CDate({Invoice.ExpirationDate})
End If
The ToWords() function takes a number and converts it to its equivalent in words. This is similar to writing a dollar amount on a check and then spelling out the full amount in words. It prints the decimal portion as “##/100”. You can set the number of decimals it displays by passing a number to the second argument, which is optional. Notice in the second example how it only displays one decimal place and it rounds it up to the next higher number.
‘Demonstrate the ToWords() formula
Formula = ToWords(123.45) ‘Result is “one hundred twenty-three 45 / 100”
Formula = ToWords(123.45,1) ‘Result is “one hundred twenty-three and 5 / 100
Formatting Values for Output
When formatting output to be displayed in a report, the output is usually a combination of different data types. For example, there will be a standard text message that also displays the current value for a field. But this can cause problems because Basic syntax is a type safe language. It doesn’t allow you to concatenate text with non-string data. To build an output string with a combination of data types, you have to convert everything to a string using the CStr() function. This method works with all data types. Since the CStr() function is designed primarily for outputting data on a report, it also lets you specify how to format the data.
The CStr() function is passed the value to format as the first argument and a formatting string as the second argument. The formatting string is used as a template that describes how the value should look after it gets converted. Table 6-6 shows the different formatting characters that can be used. Table 6-7 shows examples of how different values will look after being formatted.
Table 6-6. CStr() Formatting Characters
|
Format |
Description |
|
# |
Use with formatting numbers. Each instance of it allocates space for a single digit. If there aren’t enough characters isn’t large enough, spaces are used instead. If the number is too large, the integer part will still be fully displayed. Unused digits after the decimal are zero filled. |
|
0 |
Use with formatting numbers. If the number isn’t large enough, it is padded with zeros. If the number is too large, the integer part will still be fully displayed. Unused digits after the decimal are zero filled. |
|
, |
Use with formatting numbers to designate the thousand separators. |
|
. |
Use with formatting numbers to designate the decimal separator. |
|
d, M |
Day and month as a number (without a leading zero). |
|
Dd, MM, yy |
Day, month and year as a two digit number (with a leading zero when necessary). |
|
ddd, MMM |
Day and month as a three letter abbreviation. |
|
dddd, MMMM, yyyy |
Day, month and year fully spelled out. |
|
h, m, s |
Time portions as a number without a leading zero. |
|
Hh, mm, ss |
Time portions as a two digit number (with a leading zero when necessary). |
|
HH |
Show hours using a 24 hour clock (military time). |
|
T |
Single character representation of AM/PM. |
|
Tt |
Two character representation of AM/PM. |
Table 6-7. CStr() Example Output
|
# |
CStr() |
Output |
|
1 |
CStr(1234, 2) |
1,234.00 |
|
2 |
CStr(1234.567, 2) |
1,234.57 |
|
3 |
CStr(1234.567, “#”) |
1234 |
|
4 |
CStr(1234.567, “0”) |
1234 |
|
5 |
CStr(1234, “0.##”) |
1234.00 |
|
6 |
CStr(1234, “0.00”) |
1234.00 |
|
7 |
CStr(1234.567, “#.##”) |
1234.57 |
|
8 |
CStr(1234.567, “0.00”) |
1234.57 |
|
9 |
CStr(1234.567, “#####”) |
1234 |
|
10 |
CStr(1234.567, “00000”) |
01234 |
|
11 |
CStr(#1/2/2003 “d/M/yy H/m/s t”) |
|
|
12 |
CStr(#1/2/2003 “dd/MM/yyyy HH/mm/ss tt”) |
|
|
13 |
CStr(#1/2/2003 “dd/MM/yyyy hh/mm/ss tt”) |
|
|
14 |
CStr(# |
|
Examples 1 and 2 are easy. The first argument is the number to format and the second argument is the number of decimals to display. If the number to format doesn’t have any decimals, then they are zero filled. Notice that in these examples as well as all the others, Crystal Reports rounds the decimals portion up.
With one exception, examples 3 through 10 are easy as well. The exception is that unlike the first two examples, the second argument is the format string. Using this format string lets you be very specific about how to format the number.
Stop for a moment and look at examples 1 and 5. Do you notice one thing different between them? The difference is that the output in example 5 doesn’t have a thousands separator. In both example 1 and example 5, no thousands separator is specified, but example 1 has it by default. This isn’t the case in when you use a format string. The documentation says that the format string needs to use an optional argument to specify the thousands separator. But example 14 shows that Basic syntax has a bug that keeps this from working.
Examples 5 and 6 show that if there aren’t enough decimals then both the “#” and the “0” will zero fill their positions.
Examples 9 and 10 show that if there aren’t enough digits to fill the whole number, then the “#” fills it with a space and the “0” fills it with a zero.
The dates that are illustrated in examples 11 and 12 are much easier to look at, but far from ideal. First of all, you need to be very careful about capitalization. The compiler is case sensitive when formatting date strings. When entering a format string, refer back to Table 6-6 so that you get it right.
Math Functions
Table 6-8. Math Functions
|
Function Name |
Description |
|
Abs(number) |
Return the absolute value. |
|
Fix(number, decimals) |
Return a number with a specified number of significant digits. |
|
Int(number), numerator \ denominator |
Return the integer portion of a fractional number. |
|
Pi |
3.14... |
|
Remainder(numerator, denominator), |
Return the remainder of dividing the numerator by the denominator. |
|
numerator Mod denominator |
Return the remainder of dividing the numerator by the denominator. |
|
Round(number, decimals) |
Round up a number with a specified number of significant digits. |
|
Sgn(number) |
Return a number’s sign. |
|
Sqr(number), Exp(number),
Log(number) |
The standard arithmetic functions. |
|
Cos(number), Sin(number), Tan(number), Atn(number) |
The standard scientific functions. |
Most of these functions perform basic mathematical functionality. There are only a couple of interesting points to notice. Working with whole numbers and decimals is done numerous ways. The Fix() and Round() functions take a fractional number and truncate it to a specified number of digits. The Round() function will round up to the nearest decimal. The number of decimals to display is optional and the default is zero. The Int() function is similar to the Round() function except that it only returns the whole number and will round down to the nearest whole number. Table 6-9 shows how the three functions will return a different number depending upon the decimal portion and whether the number is positive or negative.
Table 6-9. Examples of Truncating Decimals
|
Function |
1.9 |
-1.9 |
|
Fix() |
1 |
-1 |
|
Round() |
2 |
-2 |
|
Int() |
1 |
-2 |
If you want to get the whole number and you have the numerator and denominator available. You can use the \ operator to perform integer division. This does the division and only returns the integer portion of the result. The Mod operator and Remainder() function return the remainder after doing the division.
‘Demonstrate the integer division and the Mod operator
Formula = 10 \ 3 ‘Returns 3
Formula = 10 mod 3 ‘Returns 1
Formula = Remainder(10, 3) ‘Returns 1
Generating Random Numbers
Generating random numbers is a very common task for programmers. But if you aren’t familiar with it then the way they work isn’t very intuitive. This section gives you an overview of what random numbers are and how to use them.
Crystal Reports uses the function Rnd() to return a random number. The purpose of the Rnd() function is to generate numbers that are mostly non-repeating and without a pattern. The numbers are fractional and range between 0 and 1. Some examples are 0.39, 0.77, 0.5, etc. (of course these change each time).
Random numbers are used within a formula by multiplying them against the maximum value in the range of numbers you need. For example, if you need a random number between 0 and 100 then you would multiply the random number by 100. If you need a random number between 0 and 500 then you would multiply it by the number 500. To make things a little more interesting, if you need a number between 25 and 100, then you would multiply it by 75 and add 25. The following code lists some examples for you to use as a reference.
Table 6-10. Sample formulas for generating random numbers.
|
Desired Values |
Formula |
|
Integer Between 0 and 1000 |
Formula = Int(Rnd()*1000) |
|
Integer Between 0 and 25 |
Formula = Int(Rnd()*25) |
|
Fractional number between 50 and 75 |
Formula = Rnd()*25 + 50 |
The computer generates random numbers by using a complex algorithm and usually uses the system clock as a starting point. This is called the “seed value’. The problem with random numbers is that since they are calculated using an algorithm, then the numbers aren’t truly random. If the algorithm is passed the same seed value each time, then the algorithm generates the same sequence of numbers. That is why it’s a good idea to use the system clock as the seed value because the time is always changing.
There are times when you don’t want to generate completely random numbers. If you are testing the calculations of a report that uses random numbers, it can be helpful to have the same set of random numbers generated each time so that you can compare the results after each iteration. You can reproduce the same results each time for predictability purposes. Crystal Reports also lets you pass your own seed value to repeat the same random number sequence each time. Again, this helps when creating and testing your report output.
The Rnd() function takes a single argument which tells Crystal Reports what seed value to use when calculating random numbers. The possible argument values are shown in Table 6-11.
Table 6-11. Argument values for the Rnd() function.
|
Argument Value |
Purpose |
|
Any negative number (-1, -500, etc.) |
Use this negative number as the seed value for producing the list of random numbers. By using the same negative number it will produce the same list of random numbers. |
|
Any number greater than zero |
Generate the next random number using the system clock as the seed value. |
|
0 |
Return the same random number as the last time the Rnd() function was called. |
By passing different arguments to the Rnd() function you control how random numbers are created and whether the system clock is used as the seed value or not.
Date and Time Functions
Table 9-10. Date and Time Functions
|
Function Name |
Description |
|
CurrentDate, CurrentTime, CurrentDateTime |
Returns the current date and/or time. |
|
DateSerial(year, month, day), DateTime(hour,
minute, second) |
Returns a date or time. |
|
DateAdd(interval, number,
date) |
Increases the date by a certain interval. |
|
DateDiff(interval,
startdate, enddate, firstdayofweek) |
Find the difference between two dates. |
|
DatePart(interval, date,
firstdayofweek, firstweekofyear) |
Return a number representing the current interval of a date. |
|
MonthName(date, abbreviate) |
Return the full month name. When the second argument is True, it returns the 3-letter abbreviation. |
|
Timer |
The
number of seconds that have elapsed since |
|
WeekDay(date,
firstdayofweek) |
Return a number representing the day of the week. |
|
WeekdayName(weekday,
abbreviate, firstdayofweek) |
Return the full week name. Return the 3-letter abbreviation if the second argument is True. |
Table 9-11. Interval Strings for DateAdd(), DateDiff() and DatePart()
|
String |
Description |
|
“yyyy” |
Year |
|
“q” |
Quarter |
|
“m” |
Month (1 through 12) |
|
“ww” |
Week of the year (1 through 53) |
|
“w” |
Day of the week (1 through 7) |
|
“y” |
Day of year (1 through 366) |
|
“d” |
Day part of the date (1 through 31) |
|
“h” |
Hour |
|
“n” |
Minute |
|
“s” |
Second |
Crystal Reports gives you a plethora of date and time related functions to utilize. You can also combine different functions together to create very powerful date calculations. There are a lot of new concepts to learn.
DateAdd(interval, number, date)
For adding and subtracting dates and times, the easiest function to use is the DateAdd() function. Using the DateAdd() function requires passing a string representing the type of interval to modify, the number of units to add or subtract, and the date to modify. There are a number of different strings that designate the interval to modify. These interval strings are listed in Table 6-11. There is no such thing as a DateSubtract() function. To subtract a date interval, pass a negative number of units. The DateAdd() function returns a DateTime value and this may need to be converted to either a Date or a Time depending on how you intend to use the result.
The q interval is for adding financial quarters. Using one q interval unit is the same as using three m intervals (for months). The benefit of using the q interval is that many financial reports are printed on a quarterly basis. After the user is prompted for how many quarters they wish to print, you can take their input and use it to calculate a final date. Although you could use the month interval and multiply their input by 3, having a shortcut is nice and it helps makes your code self-documenting.
Rather than using the DateAdd() function to add and subtract days, it is just as acceptable to directly add a number to the Date variable. Since the date is stored as a number, adding another number to it increases the date by that number of days. The following examples both produce the same result.
Formula = DateAdd(“d”, 10, #1/1/2002#) ‘Returns 1/11/2002
Formula = #1/1/2002# + 10 ‘Returns 1/11/2002
The benefit to using the DateAdd() function is that it takes into account how many days are in each month and it checks for valid dates. As an example, say that you want to find out the last day of the next month. To do this with the addition operator, you need to know how many days are in the next month. You also need to track which years are leap years. Using the DateAdd() function is much easier because if you add one month to the current date, it will check that this returns a valid date. If there aren’t enough days in the month then it will return the last valid day of the month. The same applies to using the quarter interval. The function adds three months to the current date and makes sure that this is a valid date. If not, it returns the last valid date of the quarter.
DateDiff(interval, startdate, enddate, firstdayofweek)
The DateDiff() function returns the difference between two dates or times. It can return the difference in different intervals. These intervals can be days, months, years or any of the intervals listed in Table 6-11.
Be careful when using the DateDiff() function for calculating an interval other than the number of days. When performing a difference calculation, it counts any interval less than a single unit as zero. For example, if you want to find out how many months have elapsed between two dates, and the two dates are the Jan 1 and Jan 31, then the result is 0. This is because the interval is only a partial month and doesn’t constitute a full month. The fact that the dates are 30 days apart is irrelevant. If you change this example so that rather than use the last day of the month, you use the first day of the next month, then the result is 1. Even though the two examples had final dates that only differed by one day, the result is different. This applies to all the intervals including dates and times.
There is an optional argument that lets you specify the first day of the week. This is only used by the DateDiff() function when the interval is ww. This counts the number of times a particular day of the week appears within a date range. To pass this argument to the function, prefix the day by cr For example, Friday is crFriday. The start date does not get counted when doing the calculation, but the end date does. Thus, if you pass the function a start date that falls on a Friday, and the argument is crFriday, then the result will not include this date.
Listing 6-1. Count the number of paydays within a date range.
‘Demonstrate counting the number of paydays
Dim StartDate as Date
Dim NumberOfFridays As Number
StartDate = DateSerial(Year(CurrentDate), 1,1) ‘First day of year
NumberOfFridays = DateDiff(“ww”, {Payroll.LastPayDate}, StartDate, crFriday)
‘If the first date was a Friday, add it back
If WeekDay(StartDate) = 6 Then
NumberOfFridays = NumberOfFridays + 1
End If
Formula = NumberOfFridays \ 2 ‘Paid on every other Friday
The DateDiff() function treats the w and ww intervals differently than the DateAdd() and DatePart() functions. In both the DateAdd() and DatePart() functions, the w interval represents a single weekday and the ww interval represents a seven day period. However, the DateDiff() function treats the w interval as the number of weeks between two dates and the ww interval counts the number of times a certain weekday appears. Thus, the ww interval counts the number of times a seven-day period occurs and the w interval counts the number of times a single day occurs. These two functions treat the intervals in opposite ways.
DatePart(interval, date, firstdayofweek, firstweekofyear)
The DatePart() function returns a number representing the part of the date that you specify using the interval argument. These intervals were listed in Table 6-11. Pass the interval as the first argument and the date as the second argument.
‘Get the current quarter
Formula = DatePart(“q”, CurrentDate) ‘Returns a number 1 – 4
Use interval “w” to display the weekday and it returns a number from 1 to 7. By default, Sunday is represented by a 1. The optional third argument designates which day of the week is considered the first day of the week. It effectively shifts the numeric representation so that the day you passed is treated as the first day. If you passed this argument crTuesday, then Tuesday is represented by a 1 and Sunday becomes 6.
Use “ww” to display which week of the year a particular date falls in. It returns a number from 1 to 53. By default, the first week is the week that has January 1st in it. Use the optional fourth argument to designate a different way of determining the first week of the year. There are two other methods to do this. The first method specifies that the first week is the one with at least four days in it. The second method specifies the first week as the first one to have seven full days in it. Table 6-12 lists the different constants that are used to specify the first week of the year argument.
Table 6-12. First Week of the Year Constants
|
Constant |
Description |
|
crFirstJan1 |
The week that has January 1st. |
|
crFirstFourDays |
The first week that has at least four days in it. |
|
crFirstFullWeek |
The first week that has seven days in it. |
What happens if you specify the first week to be the first
one with seven full days, and you pass it a date of
Since the third and fourth arguments are both optional, if you want to specify the fourth argument, then you are also required to specify the third argument (the first day of the week). Although by default this is crSunday, you must still pass it to the function in order to be able to use the fourth argument. In this circumstance the third argument is ignored and the DatePart() function always assumes Sunday to be the first day of the week.
MonthName(date, firstdayofweek)
WeekDayName(weekday, abbreviate, firstdayofweek)
WeekDay(date, firstdayofweek)
Just like the DatePart() function, these functions are given a date value and they return part of the date. The difference is that these functions are more specialized than the DatePart() function.
The MonthName() function is passed a number representing the month and it returns the name of the month fully spelled out. There is an optional second argument that lets you specify whether it should be abbreviated to three letters or not. Pass True to the second argument to get the abbreviated name. By default, this is False and it returns the full name.
The WeekDayName() function is passed a number representing the day of the week and it returns the name of the day fully spelled out. Just like MonthName(), you can pass True to the optional second argument to get the 3 letter abbreviation.
The WeekDay() function is passed a date and it returns a number.
Both the WeekDayName() and WeekDay() functions use a number to represent the day of the week. By default, this is number is a 1 for Sunday and a 7 for Saturday. As discussed for the DatePart() function, you can shift this number by specifying a different first day of the week. If you passed crMonday to the function, then Sunday is represented by a 7. You pass this as the third argument for the WeekDayName() function and as the second argument for the WeekDay() function.
‘Demonstrate using the first day of the week argument
Formula = WeekDayName(2, True, crMonday) ‘Returns “Tue” for Tuesday
Formula = WeekDay(#1/6/2002#, crMonday) ‘Returns 7 b/c it is a Sunday
DateSerial( ) and TimeSerial( )
The DateSerial() and TimeSerial() functions can be used to create a date or time by passing the parts of the value as separate arguments to the function. The DateSerial() arguments are the year, month and day. The DateTime() arguments are the hour, minute, and seconds.
In the simplest form, these functions create a date or time using three arguments. But these functions are also very powerful for adding and subtracting values to a Date and Time. They are different from the DateAdd() function in that they perform the calculations using a cumulative process. They start by calculating a partial date (or time) value and then build upon it and modify it each step of the way. It starts by calculating the year, then it calculates the month and finally the day. This is easiest to understand by looking at a simple example first and then a more complex example. All of the examples use the following statements to declare and initialize the variable MyDate.
This code snippet shows the variable declaration that is used for the remaining examples.
‘Declare the variable for use in the examples
Dim MyDate as Date
MyDate = CDate(“
This next code snippet gets the current year and month from the current date and passes them to the DateSerial() function. It passes the value 1 as the day argument to force it to return the first day of the current month.
Formula = DateSerial(Year(MyDate), Month(MyDate), 1) ‘Returns 2/1/2006
The next function calculates the last day of the prior month by using each argument to create the next part of the date in sequence and then modifying the result according to the arithmetic.
Formula = DateSerial(Year(MyDate), Month(MyDate), 1 - 1) ‘Returns
How it calculates the result is best shown using the steps listed here.
1. Calculate the year. This returns a date with the year of 2006
2. Calculate the month. This returns a date of 02/2006.
3. Calculate
the day. The first part of the argument is 1 and this returns a date of
4. The
subtract operator tells it to subtract one day from the date as it has been
calculated to this point. Thus, it subtracts one day from
The next example is the most complex, but uses the same rules as the last example. It calculates the last day of the current month.
Formula = DateSerial(Year(MyDate), Month(MyDate) + 1, 1 - 1) ‘Returns 2/28/2006
1. Calculate the year. This returns a date with the year of 2006.
2. Calculate the month. This returns a date of 02/2006
3. The addition operator tells it to add one month. This returns a date of 03/2006.
4. Calculate
the day. The first part of the argument is 1 and this returns a date of
5. The
subtract operator tells it to subtract one day from the date as it has been
calculated to this point. Thus, it subtracts one day from
You can see from the three previous examples that using a cumulative approach to calculating the date is very powerful. It’s almost like using a single function to write a simplified macro.
Timer
The Timer function returns the number of seconds that
have elapsed since
In the report Header put the following formula:
BeforeReadingRecords
Global StartTime as Number
StartTime = Timer
Formula = “” ‘A necessary evil that won’t effect the calculation
In the report Footer put the following formula:
WhilePrintingRecords
Global StartTime as Number
Formula = Timer – StartTime
‘This returns the number of seconds it took to run the report
Print
State Functions
Need to add these!!!! Summarize here but discuss in
more detail in the appropriate sections???
Other Functions
Although this chapter and the last two have listed many useful functions, Crystal Reports still has many more to choose from. You’ve seen all the primary ones and I’m going to leave the remaining ones for you to explore on your own.
Building Custom Functions
Crystal Reports gives you numerous built-in functions to choose from. In fact, its library of functions surpasses many other software applications on the market. But of course, these functions were designed to be utilized by a wide variety of people and they can’t possibly do everything you need them to do. Because of this, Crystal Reports gives you the ability to create your own custom functions that are designed for your specific needs. Just like the Crystal Reports’ functions, your custom functions can be used within any formula on your report.
If you write a lot of formulas for your reports, you might notice that some of the logic is repeated in different formulas. For example, if your company has offices in multiple countries, performing currency conversions in a formula is very common. You have to re-type this logic into each formula. To make matters worse, if the logic ever changes then you have to go back and fix it in every formula that used it. This can become a maintenance headache. By taking this common logic out of the formulas and putting it into a custom formula, you centralize the code into a single location. The custom function can now be referenced by other formulas in the report and making changes to it is done in a single place. The new formula automatically updates the calculations in the other formulas that reference it.
Before getting into the steps for creating a custom function, let’s make sure we thoroughly understand how they work. This will make it easier to see how to best utilize them as well as understand what their limitations are.
How Custom Functions Work
To understand how custom functions work, you first have to understand their purpose. Custom functions allow you to share and reuse formula logic. Putting common logic into a single function makes it easier to maintain this code and makes it possible to simplify formulas that use the function. Your reports become easier to write and maintain.
Sharing program logic is a huge benefit because this isn’t possible with formulas. Throughout this whole chapter we’ve discussed how to use the Formula Workshop to build formulas, but these formulas are all independent of each other. They can’t talk to each other or have one call the other. A custom function’s sole purpose is to help other formulas do their job. This difference makes them the exact opposite of each other. Let’s look at the differences between formulas and custom functions.
Formulas are listed in the Field Explorer under the Formula Fields node. They are displayed on a report by dragging and dropping them onto a report. Custom Functions can’t be used on their own (dragged and dropped onto a report). They have to be called from a formula. Since they can’t be displayed directly on a report, you won’t find them listed in the Field Explorer window. They are only listed within the Formula Workshop dialog box under the Custom Functions category.
Formulas work with report data to produce their return value. As the report data changes their results change. Custom functions are stateless. This means that they don’t have access to any report data and they have to have all external data passed directly to them via their arguments.
Formulas can’t directly pass data to another formula. If you want to share data you have to use Global variables that are available to all formulas. Custom functions define a set of arguments that are used to get data from a formula. A formula talks directly to a custom function by passing data to these arguments.
Formulas are not allowed to return an array or a range type variable. Custom functions are allowed to do this.
Due to the differences between formulas and custom functions, limitations are imposed on custom functions.
· You can’t use report fields and database fields. This would violate the rules of being stateless.
· You can’t use global variables or shared variables (unless passed as an argument). However, you can create local variables and use them within the custom function.
· You can’t use recursion (a function calling itself repeatedly).
·
You can’t use Evaluation Time,
· You can’t use the functions: Rnd(), CurrentFieldValue(), DefaultAttribute(), and GridRowColumnValue().
Now that you have an understanding of how custom functions work and what their limitations are, let’s see how to create them.
Creating Custom Functions
There are two ways to create a custom function. The first is to use an existing function as the basis and have Crystal Reports analyze it and build a new function from it. This is referred to as extracting the formula. The second is to create it from scratch on your own. You do this when you don’t have an existing formula to work with. Formula extraction is the easier of the two methods because you let Crystal Reports do most of the work.
Understanding the Formula Extractor
The easiest way to create a new custom function is to use an existing formula as the template. Crystal Reports gives you the option of specifying an existing formula and having it extract the code from it and use it to create a new custom function. This has two benefits. The first benefit being that Crystal Reports does the work for you. But the second benefit is that it also error checks the existing formula first to make sure it is compatible with custom functions. As mentioned earlier, custom functions have a set of rules that they must follow and Crystal Reports won’t let you create a new function that doesn’t follow these rules. If it finds that a formula can’t be converted, it lists the reasons why so that you can learn from it.
The job of the formula extractor is to convert a formula into a generic format so that it can be used as a custom function. It does this by copying the majority of the programming code and scanning the formula for any report fields or database fields that need to be replaced. Since these fields aren’t allowed in custom functions, it creates an argument for each one and replaces the field name with the argument name. To see how this works, let’s look at a simple formula that calculates the number of days between two fields. Here is the original formula:
//This formula calculates the number of days it takes to ship
//an order from the original order date (includes the order date).
{Orders.Ship Date} - {Orders.Order Date} + 1
The first two lines are a comment telling you the formula’s purpose. The third line calculates how many days it took to ship the product after the order was placed. It adds 1 to the difference so that the date of ordering is counted as one full day. This prevents it from saying that an order was shipped in zero days. The problem with this formula is that it only works with the fields Ship Date and Order Date. If you later wanted to perform the same calculation on two different fields then you would have to repeat this logic in another formula.
Let’s use the formula extractor to convert this to a custom function that can be called from any formula. The results of running the formula extractor are as follows:
Function (dateVar v1, dateVar v2)
//This formula calculates the number of days it takes to ship
//an order from the original order date (includes the order date).
v1 - v2 + 1
The first line uses the Function keyword to declare that this is a custom function. The function’s arguments are listed within matching parentheses. They are called v1 and v2 by default (we’ll see how to change this to a more significant name in the next section). The original formula had two report fields, Ship Date and Order Date. This corresponds exactly to how many arguments were created in the custom function.
The next two lines of code are just a copy of the comments and don’t have any significance except to show that the function extractor will copy everything from the original formula. The last line calculates the difference between the two dates, but this time using the argument names instead of the field names. You can see how the formula extractor copied the original formula almost verbatim. The only differences being that it declared arguments for each field and replaced the field names with the argument names.
Before leaving this example, there is one more question we haven’t answered yet: What happens to the original formula? Since the formula’s logic is now inside the new custom function, shouldn’t we update the formula to call the new function? Yes, you should. And what’s even better is that the formula extractor will do it for you. Here is the revised formula so that it calls the custom function:
DateDifference ({Orders.Ship Date}, {Orders.Order Date})
It simply calls the new function and passes the two date fields to it. The formula is greatly simplified and anytime the custom function gets modified, the changes are reflected directly in this formula.
Creating custom functions is frequently done later in the report development process. For example, you might create a report formula and display it in the report. And then a little later as you are writing another formula you realize that some of its logic is similar to an existing formula. Rather than redo the logic, you decide to create a custom function and use the formula extractor with the original formula. This saves you the work of having to rewrite the entire formula from scratch.
Using the Formula Extractor
The formula extractor is found within the Formula Workshop. When you create a new custom function you are given the option to use the editor to type it in directly or use the formula extractor. If you click the button Use Formula Extractor, it opens the Formula Extractor dialog box. See Figure 6-1.
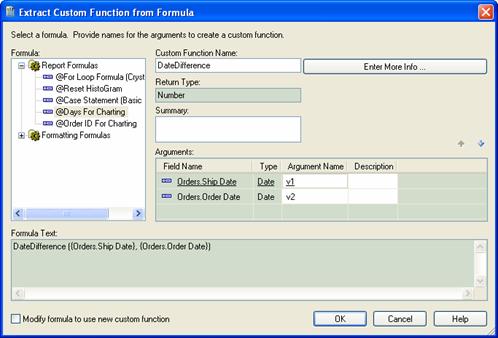
Figure 6-1. The Formula Extractor dialog box.
The Formula window on the left displays the report formulas and formatting formulas. You can select a formula from either list. To select a formula for conversion, you only have to single-click it. The right side of the dialog box automatically changes to show you the internal workings of that formula.[3] At the top is the custom function name and below it is the data type that will be returned. You can change the name if you like, but you can’t change the data type because the formula controls that. Under the Return Type is a summary text box. Type in a description of what the custom function does.
The Arguments window lists each argument that the formula extractor will create. It shows you the field name that it is derived from, the data type, the argument name, and the description. Both the field name and the data type are fixed. You can’t change them because they are derived from the original formula. The Argument Name and the Description can and should be changed. By default, the formula extractor names each argument as v1, v2, v3, etc. This is a meaningless name and should be changed to a name that is more descriptive. The Description is where you can type in a more thorough description of the argument.
At the bottom of the dialog box is the Formula Text window. This tells you how the original formula should be changed so that it calls the custom function. Notice that it also tells you the order that the fields should be passed to the function. In this example, the Ship Date field maps to v1 and the Order Date field maps to v2.
A nice feature is the checkbox below the Formula Text window. By selecting it, the Formula Extractor automatically modifies the formula so that it uses this text that calls the custom function.
When you click the OK button, the new custom function is automatically created and added to the Formula Workshop in two different places. The first place it’s listed is the Report Custom Functions list. This lets you come back to edit the function at a later time. The second place it’s listed is in the Report Functions window with all the other Crystal Report functions. It is shown under the Custom Functions category. This lets you reference it when you are writing report formulas.
If you selected the Modify checkbox, the original formula that this custom function was derived from is modified so that it calls the new custom function and passes the proper fields as arguments.
Custom Function Optional Properties
At the top right corner of the Formula Extractor dialog box is the Enter More Info button. This lets you set additional properties for the custom function.
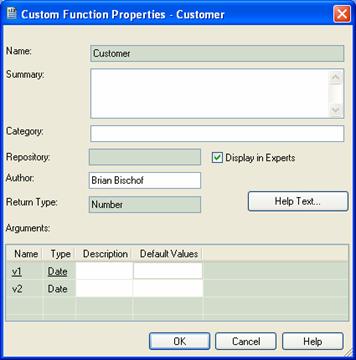
Figure 6-2. The Custom Function Properties dialog box.
This dialog box lets you set various properties about the custom function. The Summary area is the same summary that you typed in the Formula Extractor dialog box. But now it’s bigger so that you can easily type in more information.
The second text box is the Category option. This lets you group custom functions together in a more logical fashion. By default, all the custom functions are listed under the Report Custom Functions node. But if the report uses numerous custom functions, then it is helpful to create function categories and group each function within the appropriate category. That makes it easier to find a function when you want to use it. If you want to create sub-categories, use the forward slash between each category name. For example, entering a category name of Financial/Accounts Receivable creates the category Accounts Receivable under the Financial category.
The other properties only effect how the custom function works with the Formula Expert. The Formula Expert is discussed in detail in the next section, but it basically makes it easy to create a new formula that calls a custom function.
The property Display in Experts determines whether the function is listed as an available function when the user runs the Formula Expert. If you uncheck this property then the custom function is not available in the Formula Expert dialog box. Note that the custom function will always be listed in the Report Functions window so that you can reference it when writing formulas manually.
The Help Text button lets you write help information about the function. This help information is only displayed when using the Formula Expert dialog box.
The Arguments window at the bottom of the Formula Extractor dialog box is similar to what you’ve already seen. It shows each argument name, the data type and the description (which you can change). The difference is that there is a new column for entering default values. These default values are listed in the Formula Expert dialog box. They can be selected as one of the arguments that get passed to the function. By clicking on the Default Values box it opens a dialog box which lets you build a list of default values.
When you are finished changing the additional function properties, click the OK button to save them and return to the Formula Extractor dialog box.
Note
The reason that some of the properties on the Custom Function Properties dialog box are duplicated from the original Formula Extractor dialog box is because the Custom Function Properties dialog box is also used when creating a custom function from scratch. Since the Formula Extractor is somewhat of a “wizard” that helps you create a new custom function, it makes sense that some of the properties would appear both places.
Tutorial 6-1. Using the Formula Extractor
Let’s practice using the formula extractor and see if we can handle a few surprises while we’re at it. We’re going to take a formula that breaks some of the rules of custom functions and use the formula extractor to convert it. Here is the formula we’ll convert. It displays the histogram chart on the Crystal Reports sample report Formulas.rpt.
WhilePrintingRecords;
NumberVar i;
NumberVar delimit;
StringVar HistoGram;
if {Orders.Ship Date} - {Orders.Order Date} >= 254 then
delimit := 0
else
delimit := {Orders.Ship Date} - {Orders.Order Date};
for i := 0 to delimit do
HistoGram := HistoGram + "6";
HistoGram
1. Open the Crystal Reports sample report Formulas.rpt. This is found in the Crystal Reports samples directory. Save the report as “Custom Histogram Function.rpt”.
2. Preview
the report and look at the Histogram column. It displays a string with
hourglass icons. Each icon represents how many days it took to ship a product
after it was ordered. The formula that creates this string is called For Loop Formula
and was written with
3. Open the Formula Workshop dialog box by clicking on the Formula Workshop button.
4. Create a new custom function by right-clicking on the Report Custom Functions category and selecting New. Enter the name HistogramChart.
5. Click the Use Extractor button. The dialog box immediately opens and tells you that the formula can’t be converted because it contains the function WhilePrintingRecords and it uses global variables. Let’s see if we can get around this.
6. Click
the Cancel button so you return to the Formula Workshop dialog box. Find the For Loop Formula
and edit it. Since the function WhilePrintingRecords can’t be called,
comment it out. We will add it back into the original formula after it gets
converted. The new code should look like this:
//WhilePrintingRecords
7. The
second error is that the formula uses global variables. The variable
declarations don’t define a scope, but
Local NumberVar i;
Local NumberVar delimit;
Local StringVar HistoGram;
8. Save your changes.
9. Try to run the formula extractor again (see steps 3-5). This time there are no errors listed and the Formula Extractor dialog box opens.
10. Change the argument names from v1 and v2 to ShipDate and OrderDate respectively.
11. At the bottom of the dialog box is the Modify Formula checkbox. Click on it so that For Loop Formula gets automatically updated to call this function.
12.
Click the OK button to save your changes.
At this point the HistogramChart
custom function gets created and the For Loop Formula gets updated.
13.
We are almost finished except for one thing. In Step 6 you commented out
the WhilePrintingRecords function because it isn’t allowed in a custom
function. But we still need to call it from the report formula. So let’s edit
the formula and add this function back.
14. You should still be in the Formula Workshop dialog box, so click on the For Loop Formula to edit it. The dialog box probably doesn’t look like what you are used to. This is because the formula was modified with the formula extractor. Click on the Use Wizard button[5] to return the screen to normal.
15. The formula’s code is shown in the Definition area. It has one line that calls the HistorgramChart() function and passes the two date fields as arguments. We originally commented out the WhilePrintingRecords function, so let’s add it back as the first line of the formula so that it gets called for every report row.
16. At this point you’ve added the custom function and modified the original formula. Click the Save and Close button to close the Formula Workshop and save your changes.
17. Preview the report and you should see that the Histogram column still displays a list of hourglasses representing how many days it took to ship a product. Even though the report looks the same, you’ve made a lot of changes behind the scenes. The HistogramChart() can now be called elsewhere in the report if you need to display it.
This tutorial walked you through the steps of converting a fairly complex formula into a custom function. You also learned that even though the formula extractor might initially tell you that a formula can’t be converted, you can temporarily modify the formula to convert it and then go back and correct it later.
Writing Functions Manually
Without a doubt, using the formula extractor makes creating functions easy. But it only works if you have existing functions already written. For those times when a formula doesn’t already exist, you have to write the custom function from scratch. Luckily, if you are adept at writing formulas then writing custom functions is not much different.
Writing functions manually has two additional requirements
compared to writing formulas. The first is that you have to declare the
function and the second is that you have to create the argument list. Declaring
the function is pretty simple. In Basic syntax, use the Function keyword
followed by the function name.
Here is the code template using Basic syntax:
Function DaysToShip()
DaysToShip=
End Function
Basic syntax uses the Function keyword to start the code block and the End Function keyword to finish it. It also gives you the code to return the value back to the calling formula.
Here is the code template for
Function()
Compared to Basic syntax, this is much simpler. All you need is the Function keyword and nothing else. You can write the programming logic just as you do with formulas.
Declaring Function Arguments
Arguments are how you pass external data from a formula to the function. The arguments for a custom function are listed on the same line as the function declaration and they have two rules. The first is that they must be enclosed in a set of matching parentheses and the second is that multiple arguments are separated with commas.
In Basic syntax the function declaration would look like this:
Function DaysToShip(BeginDate As DateTime, EndDate As DateTime)
In
Function(DateTime BeginDate, DateTime EndDate)
Function arguments have a unique feature that variables don’t have: they can be declared as optional. This means that when a formula calls a function, it doesn’t have to pass a value for every argument. When an optional argument isn’t passed a value, it uses a default value instead. This insures that every argument has a value even though it may not have come from the formula that called it.
To declare an argument as optional, use the Optional keyword before the argument declaration and specify the default value after the declaration.
In Basic syntax, declaring optional arguments looks like this:
Function ShowName(LastName As String, Optional FirstName As String=””)
In
Function (StringVar LastName, Optional StringVar FirstName :=””)
After making the function declaration and defining the arguments, the final step is typing in the custom function’s code. As I mentioned before, this is no different than writing a formula. However, there is one exception for Basic syntax. When returning a value from a formula, Basic syntax requires the value to be assigned to the built-in Formula variable. But when working with custom functions, you have to use the function’s name instead of the Formula variable. For example, the following code listing assigns the result to the function name DaysToShip.
Function DaysToShip(BeginDate As DateTime, EndDate As DateTime)
DaysToShip=EndDate – BeginDate + 1
End Function
Using the Formula Expert
The previous section made references to the Formula Expert dialog box, but unfortunately you probably didn’t completely understand what it was because it had not been discussed yet. The Formula Expert is a tool that makes it easier for you to use the custom functions you’ve written. It lets you select a custom function and populate the arguments without writing any code. When you select the custom function to use, it lists every argument within the custom function. You fill in a value for each argument and save it. Behind the scenes it is creating the call to the function for you. Effectively, you created a formula without writing a single line of code. It was all done by pointing and clicking the mouse.
At first this sounds like a pretty good way to write
formulas in your report. After all, not writing any code is much easier than
learning Basic syntax or
· It is only compatible with custom formulas that you already created.
· It can only reference a single custom function.
· You can’t add any additional logic around the custom function.
What I find ironic about the Formula Expert is that it is designed to make it easy for someone who doesn’t know how to write formulas to use a custom function. But if you are smart enough to write a custom function, then it goes without saying that don’t need the Formula Expert to help you call the custom function from a formula. The exception is someone who is working on a report created by someone else or if there are functions in the Business Objects Enterprise Repository that you need to use.
To use the Formula Expert, create a new formula as you normally would by clicking on the Formula Fields list and selecting New. After entering the formula name, the Formula Workshop dialog box appears. Along the top of the toolbar is the Use Expert button.
![]()
Figure 6-3. The Use Expert button.
By clicking on this button the entire Formula Workshop dialog box changes. The three report tree windows along the top and the Definition area disappear. They are replaced by a Custom Function window, a Summary window, and the Function Arguments area.
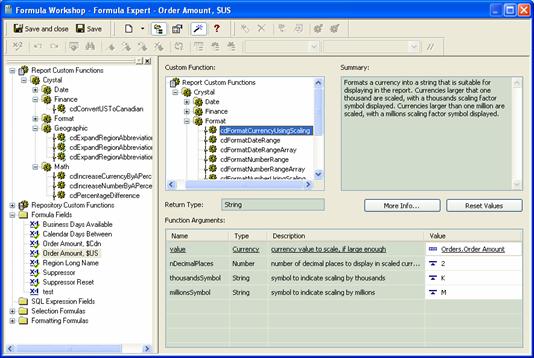
Figure 6-4. The Formula Expert dialog box.
When you click on one of the custom functions, its summary is displayed to the right and its arguments are displayed at the bottom. Figure 6-4 shows what the dialog box looks like after selecting the custom function cdFormatCurrencyUsingScaling (found in the Crystal Reports sample report Formulas.rpt).
After selecting the custom function to use, the only step left is specifying the data to pass to the function’s arguments. The list of arguments is at the bottom of the dialog box in the Function Arguments area. This area lists the argument name, its data type, and a description. The last column is the Value column. This is where you tell Crystal Reports what data you want to pass to the argument. This can be an existing report field, a constant that you type in, or any field in the report’s data source. In Figure 6-4, there are four arguments. The first argument is passed the field Orders.Order Amount. The remaining three arguments are passed constants.
One interesting thing about the Formula Expert is that if you click the Formula Expert button again, the dialog box switches back to the normal Formula Expert dialog box that you are familiar with. If you look in the Definition area you’ll see the actual formula you just created using the Formula Expert. For example, the formula that was created in Figure 6-4 is this:
Formula = cdFormatCurrencyUsingScaling ({Orders.Order Amount}, 2, "K", "M")
You can see that the end result is a one line formula that calls the custom function cdFormatCurrencyUsingScaling and populates its four arguments. It’s really quite simple.
Caution
The Formula Expert button can be clicked on when you are editing any formula. It toggles the view back and forth between the normal Formula Workshop dialog box and the Formula Expert dialog box. But you need to be careful if you are editing a formula that wasn’t created with the Formula Expert. Switching to Formula Expert mode could erase all your changes. Since the Formula Expert has the limitation of only being able to work with a single custom function, if you are editing a formula that is more advanced then the Formula Expert won’t know how to handle it. So it just erases all your work and you have to start from scratch. Luckily, before doing this it gives you a warning message and lets you cancel it.
Overall, my feelings about the Formula Expert are similar to my feelings about the Highlighting Expert: it’s a nice crutch for the very beginning report writer, but you’ll quickly outgrow it.